Table of contents
- Prerequisites
- Step 1: Create a Launch Template or Configuration
- Step 2: Create an Auto Scaling Group
- Step 3: Create CloudWatch Alarm for High CPU Utilization
- Step 4: Create CloudWatch Alarm for Low CPU Utilization
- Step 5: Create Auto Scaling Policy to Scale Out
- Step 6: Create Auto Scaling Policy to Scale In
- Step 7: Clean Up Time!
- Congratulations - you did it!🥳
Auto Scaling on AWS allows you to automatically scale your EC2 instances in or out based on defined conditions and policies. This can help ensure your applications have the compute capacity they need while optimizing costs by scaling down when resources are not needed.
In this guide, we'll cover how to set up dynamic scaling policies that automatically adjust the desired capacity of your Auto Scaling group based on CloudWatch alarms for CPU utilization.
Benefits of Dynamic CPU Scaling:
Automatically scale out capacity to handle increased traffic or load when CPU is high
Automatically scale in capacity during lower traffic periods when CPU is low
Optimize costs by only running the number of instances you need
Let's explore how to implement this setup through the AWS console!
Prerequisites
An AWS account
Access to the EC2 and CloudWatch services in the AWS Management Console
Step 1: Create a Launch Template or Configuration
This defines the configuration for your EC2 instances that will be launched in the Auto Scaling group. We will choose free tier and basic default settings for this demo.
Navigate to the EC2 console and click on
Launch Templateson the left panel. ClickCreate launch template:
Choose a name for the template and include a brief description:

Scroll down to the
Application and OS Images (Amazon Machine Image)section and choose the free tierAmazon Linux 2023 AMI:
For the instance type select the free tier
t2.micro, and for key pair leave the defaultDon't include in launch template:
Under
Network settings, don't include a subnet choice and select the default Security group from the drop down menu.
Keep the default
Storage (volumes)configuration.
Review the summary and click
Create launch template.
Step 2: Create an Auto Scaling Group
Still in the EC2 console, select
Auto Scaling Groupson the left panel and clickCreate Auto Scaling group.
Give your Auto Scaling group a name:

Choose the launch template you created in Step 1 of this guide and click
Nexton the bottom right:
This next step allows you to override the launch template and change some configurations if needed. You don't need to change anything for this demo. Under
Network, you can use the default VPC and choose 3 availability zones/subnets (for example, if you create this group in Northern Virginia,us-east-1, you can choose the first 3 availability zones in the list:us-east-1a, us-east-1b, and us-east-1c). Then clickNextat the bottom:

You don't need to create a load balancer for this demo, but this next step allows you to attach an existing load balancer or create a new one.

Leave the rest on the default settings and click
Nextat the bottom.

For the
Group size, keep the desired capacity at 1. UnderScaling, set the min desired capacity to 1 and max desired capacity to 2. SetAutomatic scalingtoNo scaling policiesfor now.

Leave the defaults for the next sections and click
Nextat the bottom.
The next page gives you an opportunity to set up SNS notifications for activity (EC2 launching or termination) in this Auto Scaling group. You don't need to add notifications for this demo, so just click
Next.
The next sections gives you the opportunity to add tags to your Auto Scaling group. In the real world, you shouldn't skip this step, but it's not necessary for this demo. Click
Nextto review all the configurations for your Auto Scaling group.
If all looks good after reviewing, at the bottom of the page click
Create Auto Scaling group.
Head to
Instancesin the EC2 console to see the 1 instance launched by the Auto Scaling group in accordance with the desired capacity you indicated.
Step 3: Create CloudWatch Alarm for High CPU Utilization
This alarm will trigger the scale-out policy when average CPU utilization goes above a defined threshold across your Auto Scaling group instances.
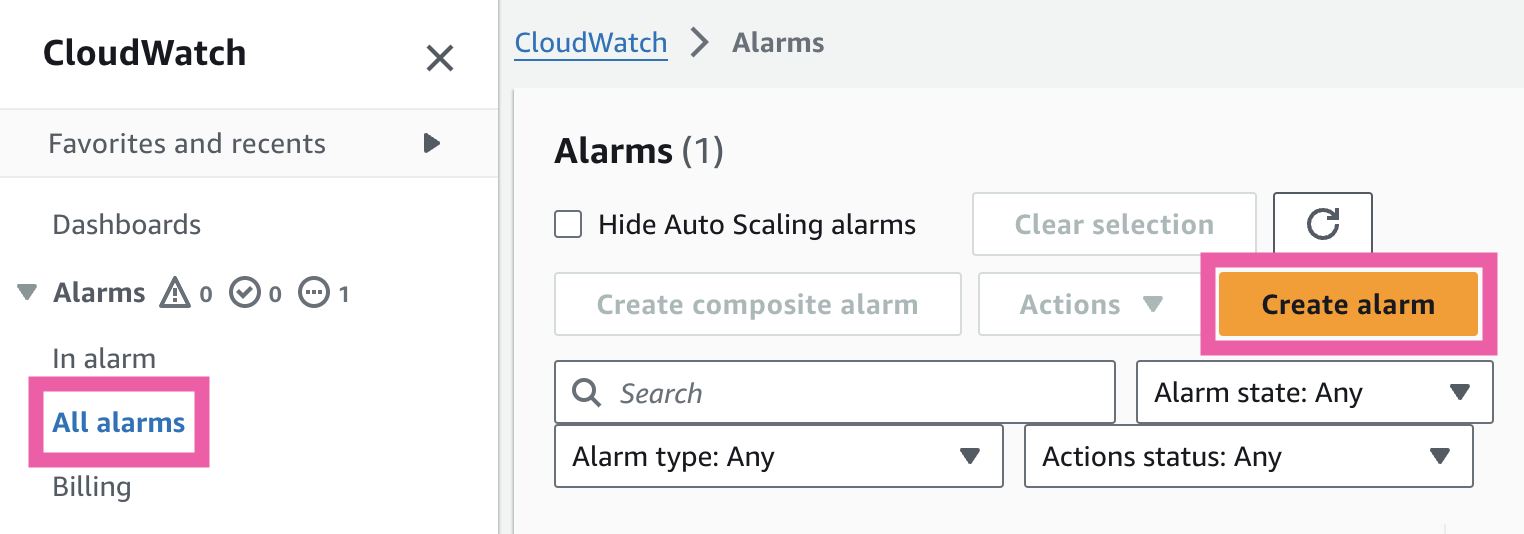
Navigate to the CloudWatch console and click
All Alarmson the left panel. ClickCreate alarm.
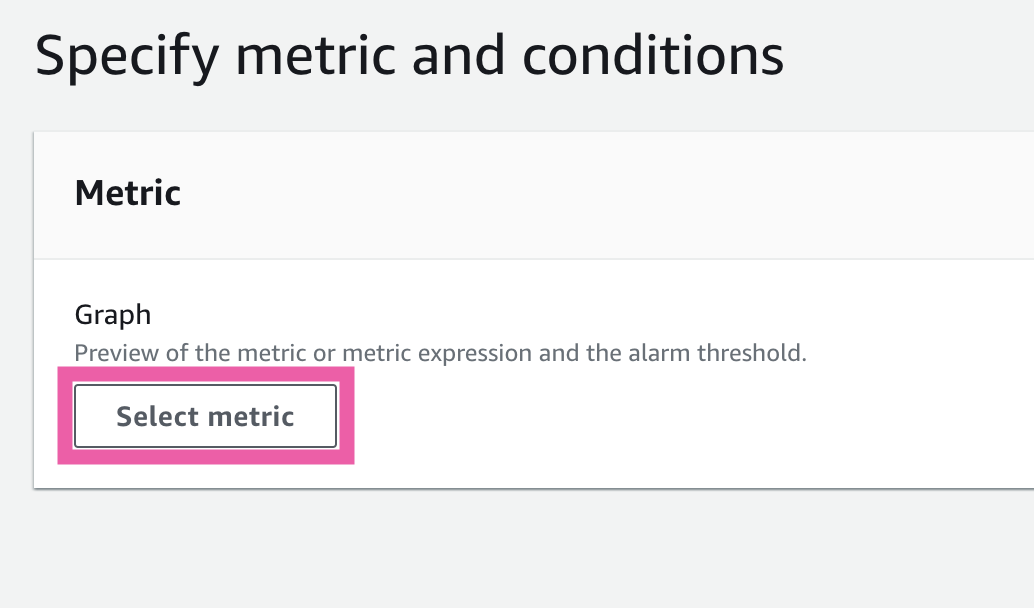
Click
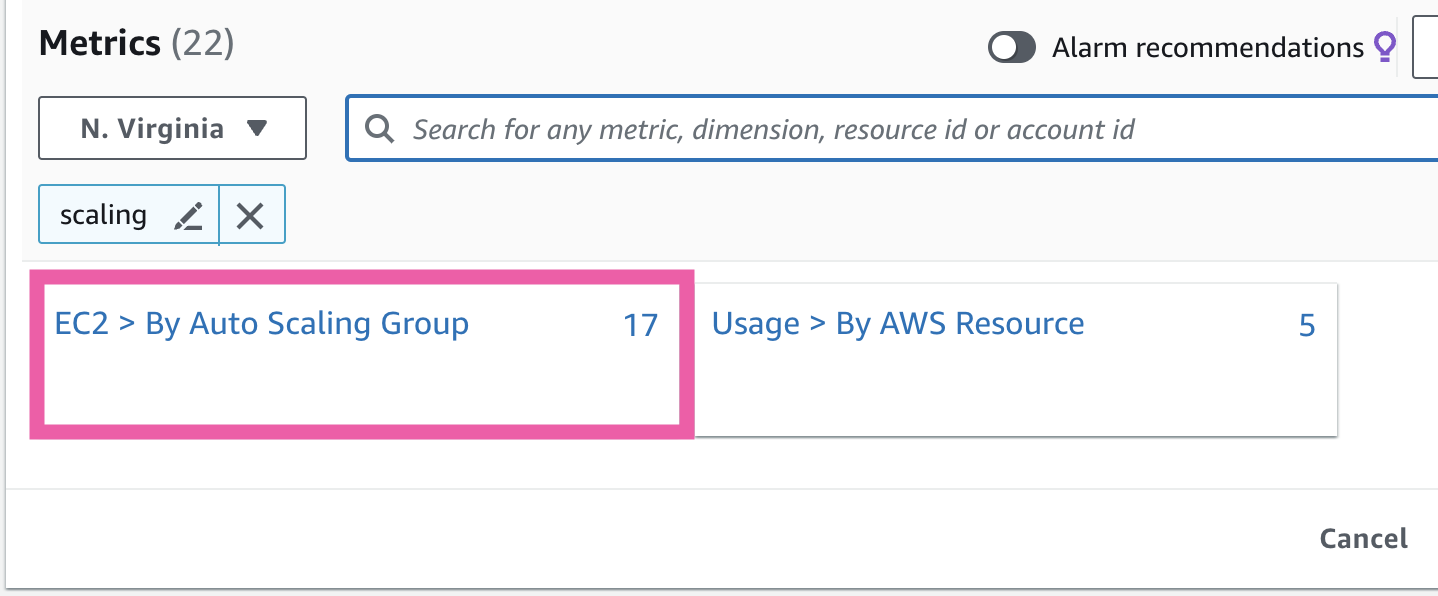
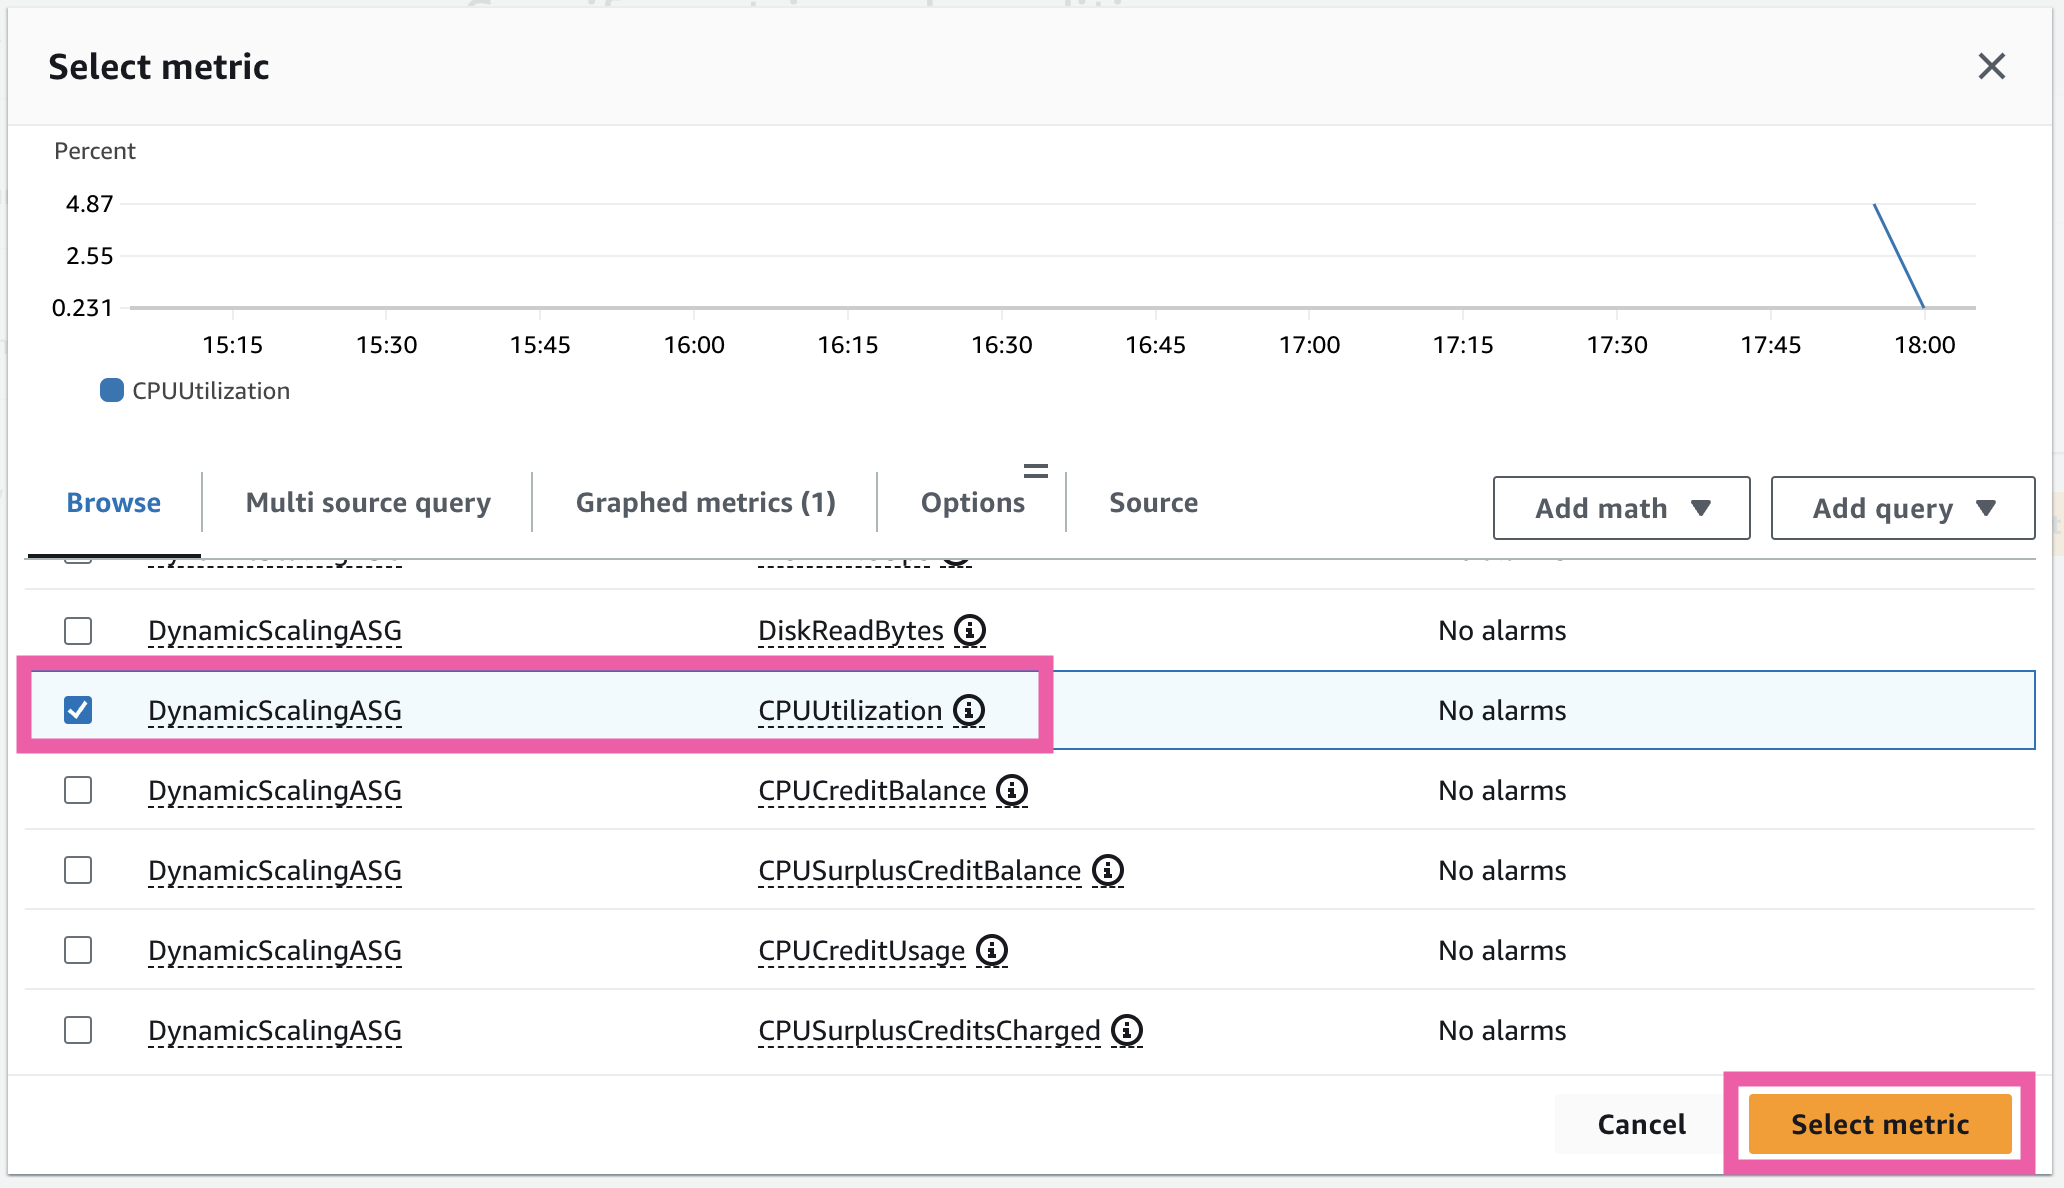
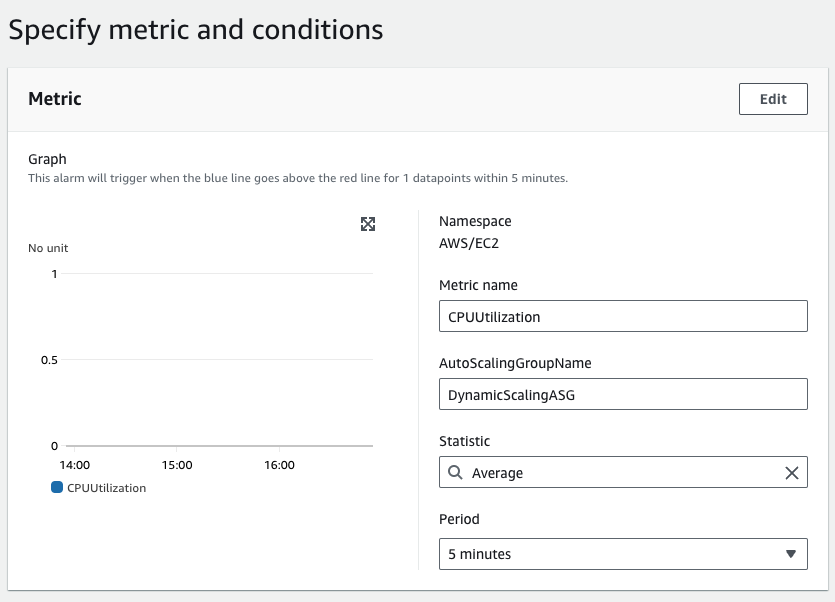
Select metric, type "scaling" in the search box, and press enter. (You can also click onEC2from the available options.) Select "By Auto Scaling Group" and choose the group you created next to the "CPU Utilization" metric, then clickSelect metricat the bottom:


On the next page, leave everything default like this:

Under
Conditionsensure the threshold type is set toStaticand define the CPU % threshold to scale out -- you can use greater than 70% for this example. Then clickNextat the bottom:
Under
NotificationensureIn alarmis selected for the trigger, then choose to create a new SNS topic. Give the topic a name and enter your email. ClickCreate topicat the bottom.

Define an Alarm name and, optionally, a description. Click
Next:
Review all the configurations on the last page and click
Create alarmat the bottom:
You will need to confirm your email for the SNS topic subscription. You should then get a message that the subscription is confirmed:


Step 4: Create CloudWatch Alarm for Low CPU Utilization
This alarm will trigger the scale-in policy when average CPU utilization goes below a defined threshold.
Repeat Step 3, but set the condition to be lower than a CPU % threshold of 30% to scale in:



(Choose the SNS topic you created in Step 3, then click
Nextat the bottom of the page.)

You should now see both alarms in the CloudWatch console:

Step 5: Create Auto Scaling Policy to Scale Out
Now it's time to configure the scaling policies! Navigate to the EC2 Auto Scaling console and click on your Auto Scaling group:

Open the Automatic Scaling tab, and click
Create dynamic scaling policy:
Select
Simple scalingfor the policy type and give the policy a name. Then choose the "High_CPU_Alarm" you created in Step 3. The action should be to add 1 capacity unit. By default, the policy will have a 300 second cooldown period before further scaling activity (you can leave the default for this demo). The Auto Scaling group itself has a default 300 second cooldown period, and you are allowed to set a different cooldown for a specific policy, which will override the group's default cooldown. Learn more in the AWS EC2 Auto Scaling cooldown documentation.
Click
Createand your first dynamic scaling policy is ready!🙌
Step 6: Create Auto Scaling Policy to Scale In
Repeat Step 5, but this time using the "Low_CPU_Alarm" and removing 1 capacity unit:


You should now see the overview for both of your dynamic scaling policies in your Auto Scaling group:

That's it! Anytime the CPU utilization goes above or below your configured thresholds for the defined period, Auto Scaling will automatically scale your group out or in based on the policy instructions. You can monitor scaling activity in the Auto Scaling console or in CloudWatch. The activity history can be found under the Activity tab in your Auto Scaling group. In this section you can also configure notifications for any scaling activity:

There is a way to test out this configuration by simulating a high traffic situation. You can overload the CPU with a special command, witness how the Auto Scaling group scales out your EC2 instances, and then kill the process and watch it scale back. All of this is done for you by the Auto Scaling group following the dynamic scaling policies you configured. While we won't be covering those steps in this demo, look out for a future blog post on how to simply test out your dynamic scaling policies.
Besides simple scaling, there are other options that may be more aligned with your use case, including target tracking scaling and step scaling. Furthermore, you can look into implementing predictive scaling policies or scheduled actions. You will be amazed by how much you can do with EC2 Auto Scaling! Follow the links to read more about the different scaling strategies with the official AWS documentation.
In terms of cost, you only pay for the instances, CloudWatch alarms, and EBS volumes you use. To avoid any charges, let's clean up the resources we created in the next step.
Step 7: Clean Up Time!
Inside your Auto Scaling group, under the
Automatic scalingtab, select the 2 dynamic scaling policies you created and clickDeleteunderActions:
Under the
Detailstab, next toGroup detailsclickEditand change the group size. Set all values to 0 and clickUpdate:

This will terminate the running instance for you. If you go back to the
Activitytab, you will see underActivity historythat the termination of the instance is in progress:
After a few minutes, confirm the instance has been terminated in the EC2 console:

Next, in the EC2 Auto Scaling console, select the Auto Scaling group you created, click
DeleteunderActions, and confirm the deletion:

Head over to the CloudWatch console, go to
All Alarms, select the 2 alarms you created, clickDeleteunderActions, and confirm deletion:
Congratulations - you did it!🥳
By implementing dynamic scaling policies in EC2 Auto Scaling, you can ensure that your applications remain responsive and cost-efficient under varying loads. This approach not only enhances the reliability and performance of your infrastructure but also empowers you to adapt swiftly to changing demands. Keep exploring and experimenting with AWS tools to unlock even more innovation in your cloud environment!🤓
