
Deploying Jenkins on AWS EC2 Using Terraform
A guide to leveraging Terraform to deploy EC2 instances with bootstrapped Jenkins


Table of contents
Let's dive in to the details of how to streamline your CI/CD workflows by deploying Jenkins on an AWS EC2 instance with Terraform.
For this demo project, we will use one main Terraform configuration file in a single directory (a monolithic configuration) to create an EC2 instance with a user data script that will install and start Jenkins at launch time.
If you are new to Infrastructure as Code (IaC), it may help to explain how Terraform works. Terraform is an IaC tool created by HashiCorp that revolutionizes how we build, change, and version infrastructure efficiently. It uses code to manage and provision the infrastructure, both in the cloud and on-premises. Terraform allows developers to define infrastructure through easy-to-understand configuration files, which can then be shared, reviewed, and versioned, making infrastructure management more consistent and predictable. To learn more, visit the official Terraform website.
Jenkins, on the other hand, is a Java-based open-source automation server used to automate the parts of software development related to building, testing, and deploying. With many plugins to choose from, we can use Jenkins to make the integration and continuous delivery of projects more efficient. To learn more, visit the official Jenkins website.
This comprehensive guide covers everything from setting up your GitHub repository and VS Code environment to the final Jenkins configuration, ensuring you're well-equipped to automate your deployment pipelines.
Objectives
Set up your GitHub repository and clone it with VS Code.
Use Terraform commands to deploy an AWS EC2 instance with one
main.tffile.Bootstrap the EC2 instance by including a user data script to install and start Jenkins when the instance launches.
Secure the Jenkins server with an AWS security group, with inbound rules to allow SSH traffic on port 22 and Jenkins web traffic on port 8080.
Access Jenkins in your browser on port 8080.
Prerequisites
Ensure you have:
An active AWS account with permissions for EC2, IAM, Security Groups.
Basic familiarity with AWS services, Terraform, and Jenkins.
An active GitHub account and basic familiarity with Git.
Terraform should be installed on your local machine: follow these official instructions to install.
VS Code should be installed on your local machine, with the Terraform extension installed. Download from the VS Code website if needed.
Have the AWS CLI installed on your local machine. Configure with your AWS credentials (access key and secret access key).
Step 1: Creating and cloning a repository on GitHub
Navigate to your GitHub account and create a new repository for this project. You can call it terraform-jenkins.

In the repository, click on the green "Code" button to copy the HTTPS link to clone the repository:

Next, open a new window in VS Code. Click on "Clone Git Repository" and enter the link you copied from GitHub. This will copy the repository to your local machine.


You should now be in your repository. Make sure the terminal is open at the bottom. Your files and directories are on the left panel and the code editor is at the top. It should look like this:

For now, you will only have a README.md file showing on the left.
Step 2: Project Preparation
Use the following commands in the VS Code terminal to make sure your AWS CLI is set up and configured and that Terraform is installed:
aws --version # Update if necessary
aws configure # Configure with your access and secret access keys
terraform -v  # Install if not present

If you are missing the AWS CLI or Terraform, click on the links below to follow the official instructions for installation:
All good and ready to go? Let's get started!
Step 3: Writing Terraform Configuration
Main.tf File
Create a main.tf file using the following commands in the terminal:
touch main.tf

You can also use the GUI to create a file. On the left under "Explorer", click on the New File icon next to the name of the workspace/repository:

Once your main.tf file is created, select it on the left under "Explorer" and you should now be able to add the code to the file.
Paste the following configurations into your main.tf file:
Provider Configuration
Here you are stating the provider you'd like to use (if you'd like a complete list, visit the Terraform Registry for all the provider options). In this case it is AWS, and we'd like to deploy our infrastructure in us-east-1 (Northern Virginia).
terraform {
  required_providers {
    aws = {
      source  = "hashicorp/aws"
      version = "~> 5.0"
    }
  }

  required_version = ">= 1.2.0"
}

#Defines the provider and region to use
provider "aws" {
  region = "us-east-1"
}
Remember, Terraform configuration files are written in HashiCorp Configuration Language (HCL) which has a declarative structure. Declarative means you are stating what you would like to see (the final result) in your cloud infrastructure, but you are not telling Terraform how to do it (it takes care of that for you.) To learn more about the Terraform language, visit the Terraform Language Documentation website. Another incredible way to learn about Terraform configuration is to complete more hands-on exercises -- there are lots of official Terraform tutorials to choose from.
Security Group
As the first resource, you can define the Security Group for your EC2 instance. In general, you don't need to worry about the specific order of the blocks defining your resources. Here you will give the Security Group a name, include a brief description of what the Security Group does, and define the inbound and outbound rules. (Note: It is best practice to allow SSH traffic from your IP address only, not from anywhere (0.0.0.0/0), but for simplicity we will allow that in this demo.)
#Defines the SG and inbound/outbound rules
resource "aws_security_group" "jenkins" {
  name        = "terraform-jenkins-sg"
  description = "Allow SSH and Jenkins web access"

#Allows inbound SSH traffic on port 22 from anywhere
  ingress {
    from_port   = 22
    to_port     = 22
    protocol    = "tcp"
    cidr_blocks = ["0.0.0.0/0"]
  }

#Allows inbound traffic on port 8080 from anywhere
  ingress {
    from_port   = 8080
    to_port     = 8080
    protocol    = "tcp"
    cidr_blocks = ["0.0.0.0/0"]
  }

#Allows all outbound traffic to anywhere
  egress {
    from_port   = 0
    to_port     = 0
    protocol    = "-1"
    cidr_blocks = ["0.0.0.0/0"]
  }
}
EC2 Instance
For the EC2 instance, you will use another resource block.
#Defines the EC2 instance and arguments
resource "aws_instance" "jenkins" {
  ami           = "ami-02d7fd1c2af6eead0" # Use the latest Amazon Linux 2 AMI for us-east-1
  instance_type = "t2.micro"
  key_name      = "your-key-pair-name" #Replace with the name of your key pair in us-east-1

  security_groups = [aws_security_group.jenkins.name]

  user_data = <<-EOF
                #!/bin/bash
                sudo yum update -y
                sudo wget -O /etc/yum.repos.d/jenkins.repo https://pkg.jenkins.io/redhat-stable/jenkins.repo
                sudo rpm --import https://pkg.jenkins.io/redhat-stable/jenkins.io.key
                sudo yum upgrade
                sudo amazon-linux-extras install java-openjdk11 -y
                sudo yum install jenkins -y
                sudo systemctl enable jenkins
                sudo systemctl start jenkins
                EOF

  user_data_replace_on_change = true

  tags = {
    Name = "jenkins-server"
  }
}
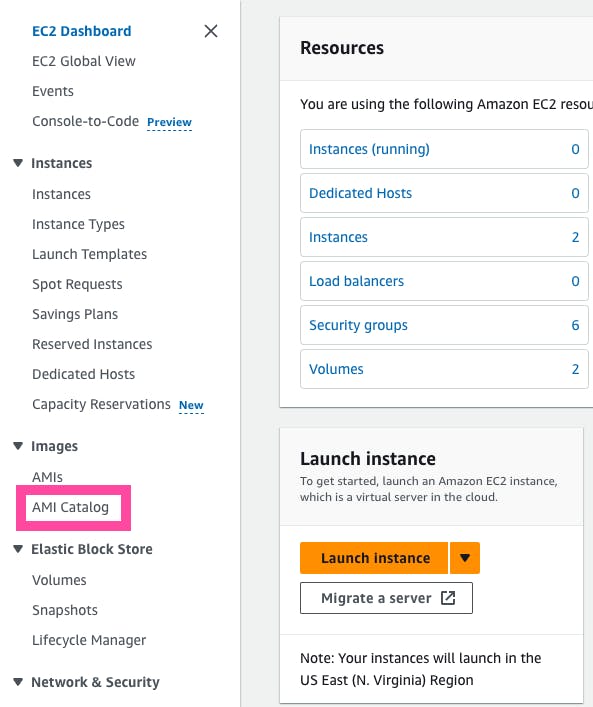
For the AMI, head to the EC2 console and check to make sure you are still in the us-east-1 region. The AMI ID will change in different regions, so ensure you are in the correct region. You can click "Launch instance" and find the AMI ID for Amazon Linux 2 under Application and OS Images (Amazon Machine Image). Conversely, you can find the AMI ID in the AMI Catalog in the EC2 console.


For the instance type, you can use t2.micro because it falls under the free-tier.
Replaceyour-key-pair-namewith your actual AWS key pair name. (Don't forget to do this - the resource creation will fail if you don't provide the actual key pair name!)
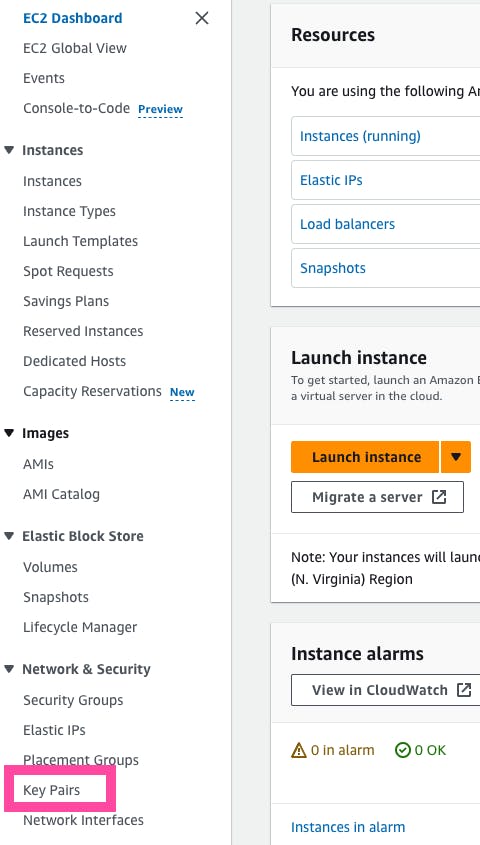
The key pair is specific to the selected region, and you can choose a key pair in case you need to SSH into the server. If you do not have a key pair, you have the option to skip this step and remove the key_name argument from the configuration file. If you'd like to add one, you can create it by going to "Key Pairs" on the left navigation panel under Network & Security and clicking on the orange "Create key pair" button.


In your main.tf file, under the EC2 instance resource block, you also reference the security group created in the previous resource block: this is important because this will assign the security group to your EC2 instance. Since you do not have the security group ID yet, you reference it by using the name we gave it (jenkins) in the previous security group resource block.
The user data of the EC2 instance allows you to run a bootstrap script. The commands in the script will run at launch time, installing and starting Jenkins as the server boots.
The part that says user_data_replace_on_change = true simply means that if the user data changes it will destroy the EC2 instance and create a new one, and it will run the new user data script at launch time.
(Note: For official documentation on how to install Jenkins on the server, you can go to the Jenkins website. It covers downloading and installing Jenkins on the Amazon Linux 2023 AMI, not Amazon Linux 2, so some of the commands are different from the ones we need for this demo. The code in this tutorial should work properly for the Amazon Linux 2 AMI.)
This is what your main.tf file should look like in VS Code:


Now that you have explored the different parts that create your configuration file, you can get the complete main.tf file from my GitHub or copy the full code below:
terraform {
  required_providers {
    aws = {
      source  = "hashicorp/aws"
      version = "~> 5.0"
    }
  }

  required_version = ">= 1.2.0"
}

#Defines the provider and region to use
provider "aws" {
  region = "us-east-1"
}

#Defines the SG and inbound/outbound rules
resource "aws_security_group" "jenkins" {
  name        = "terraform-jenkins-sg"
  description = "Allow SSH and Jenkins web access"

#Allows inbound SSH traffic on port 22 from anywhere
  ingress {
    from_port   = 22
    to_port     = 22
    protocol    = "tcp"
    cidr_blocks = ["0.0.0.0/0"]
  }

#Allows inbound traffic on port 8080 from anywhere
  ingress {
    from_port   = 8080
    to_port     = 8080
    protocol    = "tcp"
    cidr_blocks = ["0.0.0.0/0"]
  }

#Allows all outbound traffic to anywhere
  egress {
    from_port   = 0
    to_port     = 0
    protocol    = "-1"
    cidr_blocks = ["0.0.0.0/0"]
  }
}

#Defines the EC2 instance and arguments
resource "aws_instance" "jenkins" {
  ami           = "ami-02d7fd1c2af6eead0" # Use the latest Amazon Linux 2 AMI for us-east-1
  instance_type = "t2.micro"
  key_name      = "your-key-pair-name" #Replace with the name of your key pair in us-east-1

  security_groups = [aws_security_group.jenkins.name]

  user_data = <<-EOF
                #!/bin/bash
                sudo yum update -y
                sudo wget -O /etc/yum.repos.d/jenkins.repo https://pkg.jenkins.io/redhat-stable/jenkins.repo
                sudo rpm --import https://pkg.jenkins.io/redhat-stable/jenkins.io.key
                sudo yum upgrade
                sudo amazon-linux-extras install java-openjdk11 -y
                sudo yum install jenkins -y
                sudo systemctl enable jenkins
                sudo systemctl start jenkins
                EOF

  user_data_replace_on_change = true

  tags = {
    Name = "jenkins-server"
  }
}
Step 4: Deploying Jenkins with Terraform
Finally, the time has come to run the Terraform commands and watch how it creates the resources in your account!
You will run the commands in the terminal on VS Code. Ensure you are in the directory containing your main.tf file.
First, run the command below to download the needed plugins.
terraform init

Then, check if the syntax of your main.tf file is correct by running the following command:
terraform validate

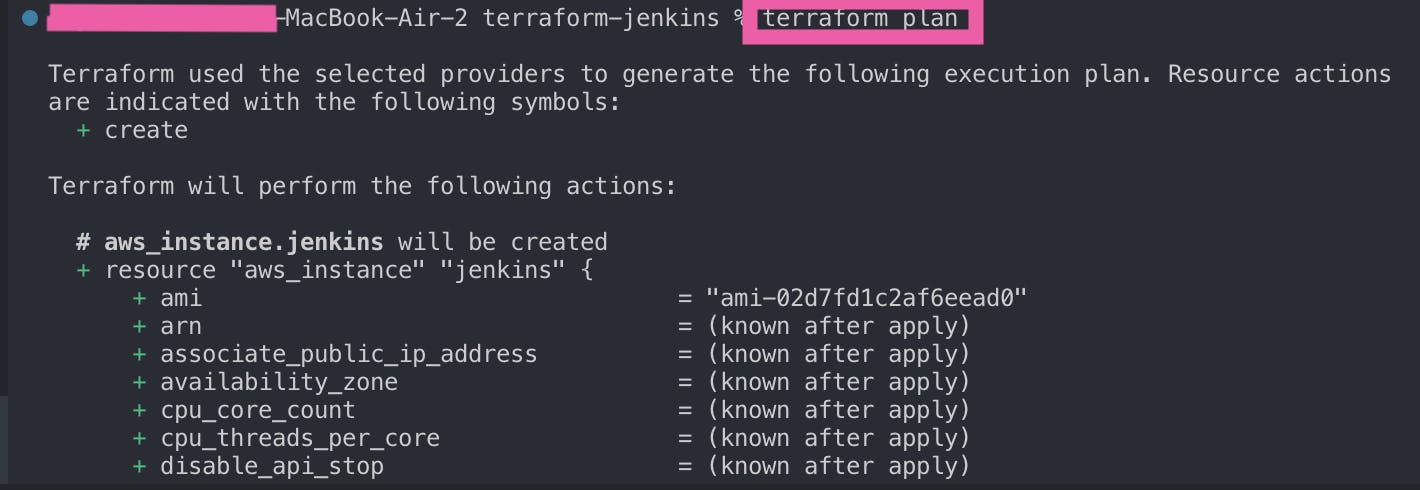
Next, to review the resources that will be created, run the command:
terraform plan

If the plan looks good and matches your desired infrastructure, run the following command to provision the infrastructure in AWS:
terraform apply
Confirm the deployment when prompted: write "yes" and hit enter on your keyboard.

It will show when the creation of each resource is complete, and it will print "Apply complete!" in green once all resources are created.

In the AWS Management Console, you can navigate to the EC2 service and click on "Instances" on the left panel to find your running instance:

Next, let's head to the VPC service in the console, where you can click on "Security groups" under Security on the navigation panel on the left.
Here, you will find the Security Group you created named "terraform-jenkins-sg."

You can also find it by selecting your EC2 instance and clicking on the Security tab.
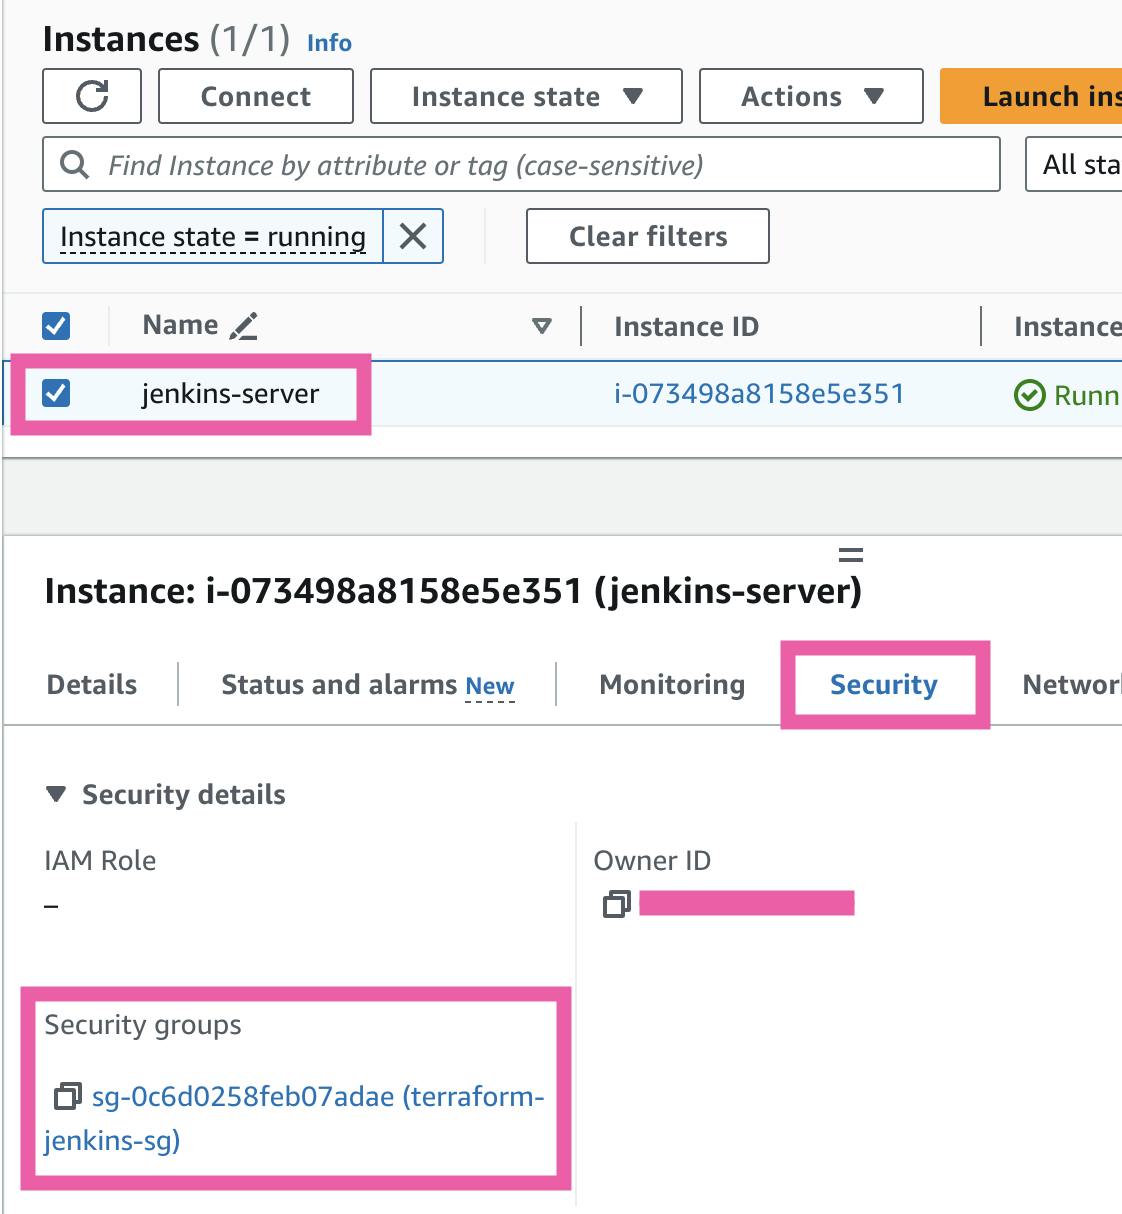
Click on the Security group ID to view more information about it. Check the inbound and outbound rules to verify that they match the configurations you defined within the main.tf file. There should be two inbound rules allowing traffic from anywhere on ports 22 and 8080, and one outbound rule allowing traffic to anywhere.


Step 5: Accessing Jenkins
Time to access Jenkins in the web browser!
It is always a good idea to connect to the instance first and verify through the shell that Jenkins is running.
You can SSH into your EC2 instance using the key pair you specified in the main.tf file under the EC2 resource. You can do this from your local machine using the terminal. For macOS, you can use Terminal (which is already installed), or you can install iTerm2. For Windows, you can use PuTTY or MobaXterm. (For this you will also need to have your key pair file downloaded on your local machine.)
Select your EC2 instance in the console (make sure it is running and both health checks have passed first), and click "Connect" at the top. There will be several tabs to choose from. To SSH into the instance, click on the SSH client tab and follow the steps provided to connect.


This takes extra steps, so let me show you a quicker way to connect to your instance (especially if you did not specify a key pair and can't SSH): use EC2 Instance Connect instead!
This will open the shell to the instance directly in your browser - just click "Connect" on the bottom right!


See? Much easier!
Once you are connected and in the shell, run the following command to verify Jenkins is running:
systemctl status jenkins


You should see in green that the service is active and running.
Now that you've checked to ensure Jenkins is running on the EC2 instance, locate your instance's public IP in the console.

Access Jenkins by navigating to http://<Your-EC2-Instance-IP>:8080. For example, the public IP address for my EC2 instance was 34.224.72.158, so I would paste the following into the browser: http://34.224.72.158:8080.
You should see this landing page in your browser:

Congrats, you did it!! 🥳 You successfully accessed your Jenkins server!
Step 6: Wrapping Up
Wrap up the project with some clean up. Destroy the resources you created by running the command:
terraform destroy
You will need to confirm that you'd like to destroy the resources by writing "yes" and pressing enter.


Great job! 🙌
You've successfully set up a Jenkins server on an AWS EC2 instance using a bootstrap script and Terraform. This powerful setup introduces an efficient infrastructure as code (IaC) management approach to implementing CI/CD tools like Jenkins and embracing the full potential of DevOps practices.
Enjoy the process and have fun learning, friends! 👩💻👨💻